Sticky elements without horizontal scrolling
Who doesn't know this: You want to set an element on your website so that it sticks to the screen when scrolling (sticky), but unfortunately that doesn't work if a higher-level div container is defined with “overflow: hidden”. As soon as this is the case, the desired sticky effect is over. But when you remove “overflow: hidden,” this often results in unwanted horizontal scrolling, which of course looks unprofessional.
Fortunately, there is a solution: “overflow: clip;”! Just add overflow: clip as a custom property, I'll show you how to do that in the video:
In my case, the wrapping div container is called “.page-wrapper.” All you have to do is use the appropriate class name from the surrounding tag. And voila, your element stays sticky without causing horizontal scrolling.
Webflow CMS trick: Add hidden CMS fields to form submissions
If you have a form on a CMS page and want to find out which page the form was sent from, you can integrate an HTML embed into the form. In this way, you can use the values of your CMS. You will then be able to determine from which specific page the form was filled out.
Use the following code for this:
How do you set up an RSS feed with Webflow?
In this video, I'll show you how to set up an RSS feed for your Webflow blog in seconds.
You then have a shareable link so that no one has to miss your posts anymore.
Blurry images on your Webflow website?

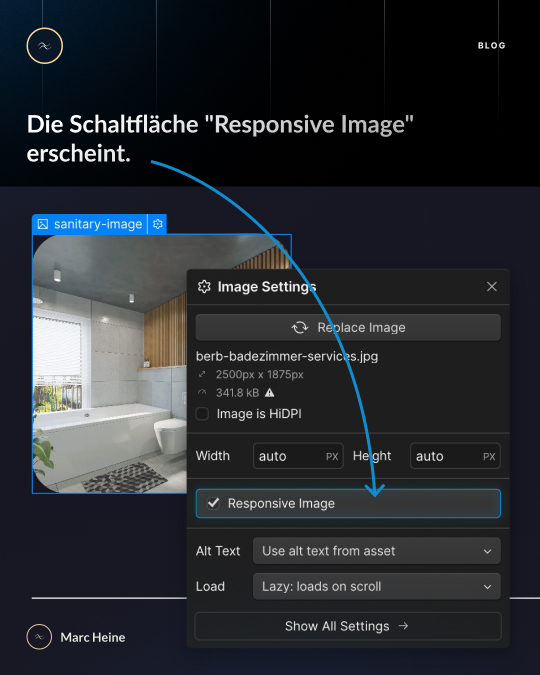
Do you know this check box - “Responsive Image”?
✅ All images in your project have this option. By default, it is active and hidden. And that's great... in most cases.
❌ But sometimes images on the live website appear blurry and are of low quality for no apparent reason. Just try disabling “Responsive Image”:
1 ️ Select the image in Webflow Designer
️ 2. Open the settings panel > Image settings
3. Tap Command + Shift + O (on Mac) or Control + Shift + O (on Windows)
4. Uncheck the “Responsive Image” box
5. Publish the project
Change text selection color
If you want to change the color for highlighted text in Webflow, no problem, with a small code snippet.
Add this CSS code to your project, you can adjust the text selection color however you want.
For the entire page, add the code to the end of <head>-Add tags:
If you just want to change a specific paragraph, no problem! Here is the code:
In this example, the <p>tag with the class “my area” selected. You can adjust the selector as needed to ensure that only the desired area is affected. Change the color codes to suit your design preferences.
Simply copy and paste the code into the “custom code” area in Webflow, and you're in control of your text selection color!
Try it out and make your website unique.
Link to specific sections on other pages

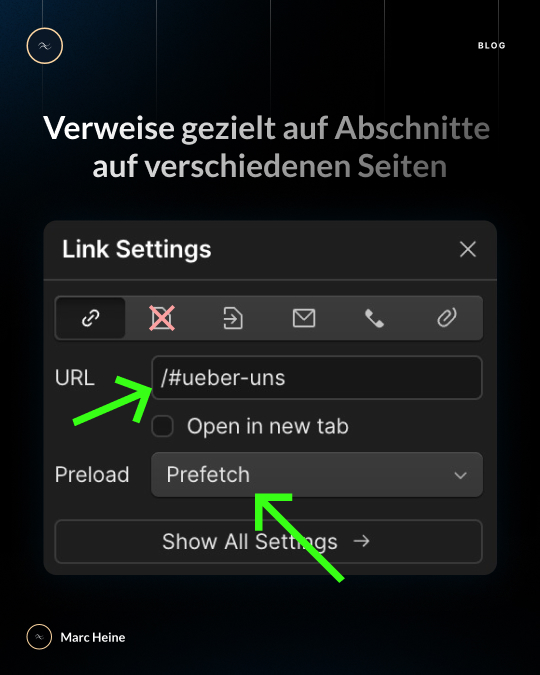
To link to specific sections of another page, select the “Link URL” field instead of a page to link to. Here you can enter/#Abschnitts -ID”. In addition, it is advisable to select “Prefetch” in the “preload” field.
Prefetching is a proactive way to improve website performance by loading and caching resources early. This anticipates user needs and speeds up page loading. Techniques such as link prefetching and DNS prefetching are used for this purpose. However, it should be applied selectively to essential resources to avoid unnecessary network traffic and cache congestion.
You can try out Webflow for free here:
https://webflow.grsm.io/77zg9e1s3png
to the design subscription from marchdept.
*Affiliate links


